Welcome to the world of iPods! Whether you’ve just rediscovered an old gem, received one as a gift, or bought your very first classic music player, you’re holding a piece of digital music history. This guide will help you take the first steps to get your iPod up and running.
1. Identify Your iPod Model
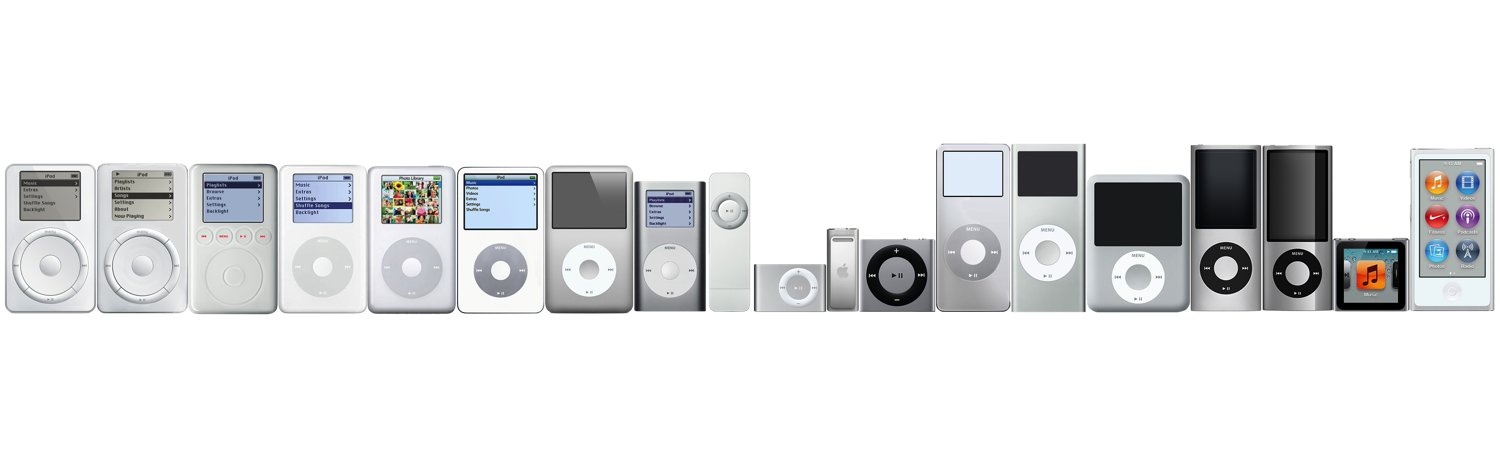
Knowing which iPod model you have is the crucial first step. This determines its features, how you interact with it, which software you need, and what parts are compatible if you ever decide to repair or modify it.
- Look for the Model Number: Turn your iPod over. On the back, usually near the bottom, you’ll find fine print. Look for text starting with “Model No.” followed by an “A” and four digits (e.g.,
 A1238).
 - Visual Cues: Note the type of controls (Click Wheel, Touchscreen, basic buttons), screen type (monochrome, color, touch), casing material (plastic, metal), and ports (30-pin Dock Connector, Lightning on very late Touch models, headphone jack).
Learn More: For a detailed breakdown of every model, specifications, and how to tell them apart, check out our comprehensive Link to Detailed iPod Identification Guide. 1. How To Identify Your iPod , 2. The iPod Classic Cheatsheet A guide to our iPod world by yuuiko
2. Charging Your iPod
Your iPod needs power!
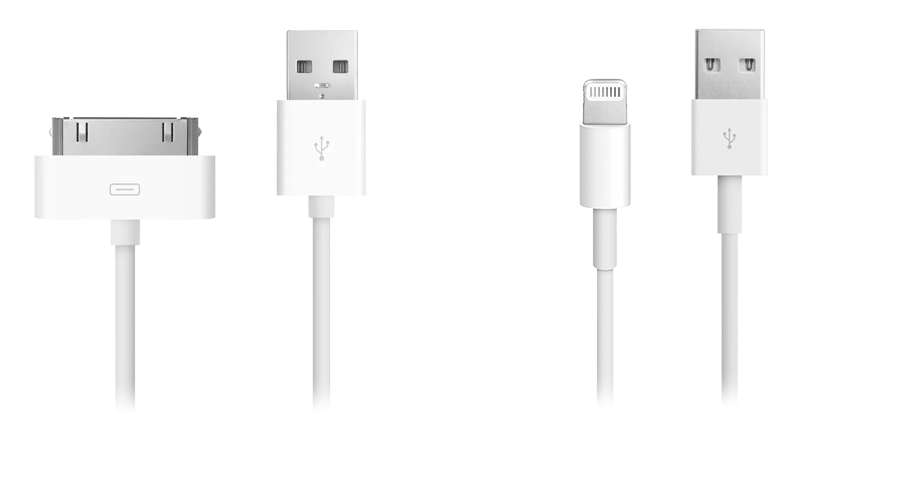
- Connect the Cable: Use the USB cable that came with your iPod (or a compatible replacement). Most classic iPods use the wide 30-pin Dock Connector; later iPod touch models use the smaller Lightning connector.
- Connect to Power: Plug the USB end into:
- A USB wall adapter (the old iphone 5V 1A charger is recomanded, it’s really cheap in the second hand market).
- A USB port on your computer (the computer must be turned on and not in sleep mode).
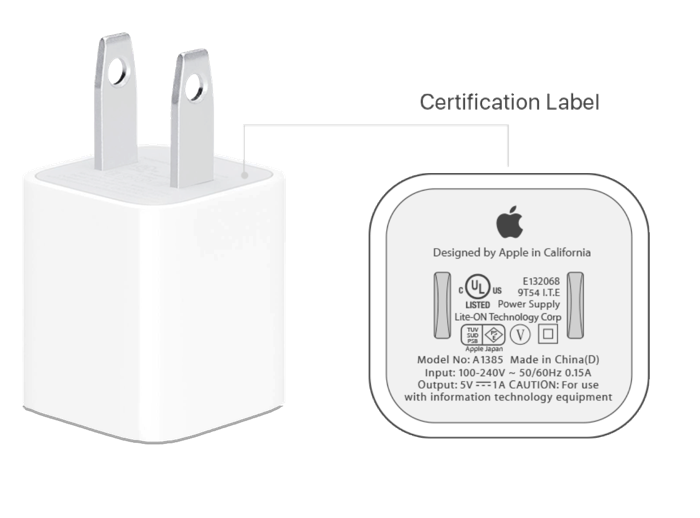
Most iPhone models earlier than iPhone 11 came with a 5W power adapter in the box.
- Charging Indicator: You should see a battery icon on the screen indicating it’s charging.
 A large battery icon usually appears when the iPod is off but charging. A smaller icon appears in the corner when it’s on. It might take a few minutes for a completely drained iPod to show signs of life. A full charge typically takes a few hours.
3. Powering On/Off and Basic Navigation
- Power On: Usually, press and hold the Play/Pause button (on Click Wheel models) or the Top/Side button (on iPod touch/Nano models) until the Apple logo appears. If it’s been charging, it might turn on automatically when unplugged or when you press any button.
- Power Off:
- Click Wheel Models: Press and hold the Play/Pause button for a few seconds.
- Touchscreen Models (iPod touch): Press and hold the Top/Side button until the “slide to power off” slider appears, then slide it.
- Navigation:
- Click Wheel: Glide your thumb around the wheel to scroll through menus. Press the center button to select. The buttons around/on the wheel typically function as Menu (go back), Play/Pause, Previous/Rewind, and Next/Fast-forward.
- Touchscreen: Use taps, swipes, and gestures similar to a smartphone. Press the Home button (if present) to return to the main screen.
4. Getting Music Onto Your iPod (Syncing)
Unlike modern streaming devices, most iPods require you to sync music files from a computer library onto the device.
![image|497x500, 40%]

- Required Software:
- On Windows (All versions) or macOS Mojave (10.14) and earlier: You need Apple iTunes. You can download it from Apple’s website or the Microsoft Store, and you can also download all history version of iTunes installers on The Apple Wiki website.
- On macOS Catalina (10.15) and later: Syncing is handled directly through the Finder. iTunes is no longer used for device syncing on these macOS versions.
- The Basic Process:
- Organize Your Music: Add your music files (MP3, AAC, etc.) to your iTunes Library or the Music app on your Mac.
- Connect Your iPod: Use the USB cable to connect your iPod to your computer.
- Open Software: Launch iTunes or open Finder. Your iPod should appear in the sidebar (under Devices in iTunes, or Locations in Finder).
- Select Your iPod: Click on your iPod’s icon/name to access its settings.
- Choose Music to Sync: Go to the “Music” tab/section. You can choose to sync your entire library or select specific playlists, artists, albums, or genres.
- Start Sync: Click the “Sync” or “Apply” button (usually in the bottom right corner).
- Wait & Eject: Wait for the sync process to complete. Once finished, make sure to properly “eject” the iPod in iTunes/Finder before disconnecting the cable.
5. Basic Care and Maintenance
- Battery Health: Avoid letting the battery completely drain too often. Try to keep it charged, but don’t worry about leaving it plugged in overnight occasionally. Lithium-ion batteries degrade over time, and eventually, you might need a replacement (which is a common modification!).
- Physical Care: Keep your iPod in a case if possible to protect it from scratches and drops. Avoid extreme temperatures and moisture.
6. Common Issues & Troubleshooting
Sometimes things go wrong. Here are a couple of common sights:
- Sad iPod Icon / Folder Icon: Often indicates a software or hard drive issue.
- Freezing / Not Responding: The device becomes unresponsive.
- Not Recognized by Computer: iTunes or Finder doesn’t see the iPod when connected.
First Aid: Try restarting your iPod. The method varies by model (usually involves holding the Menu + Center buttons, or Top + Home buttons simultaneously for several seconds).
7. What’s Next? Exploring the Possibilities
You’ve got the basics down! Now you can delve deeper into the iPod world:
- Modding: Many classic iPods can be modified! Common mods include replacing the old hard drive with high-capacity SD card storage (using adapters like iFlash) and installing larger batteries for much longer playtime.
- Rockbox: An open-source firmware alternative that can be installed on many iPod models. It offers more features, wider audio format support, and customization options than the standard Apple firmware.
- Collecting: Discover the vast history of iPod models, colors, and special editions.
8. Join the Community!
You’re now part of the ipods.me community! If you have questions, want to share your iPod story, show off a cool mod, or just chat with fellow enthusiasts, don’t hesitate to browse the forums and start a new topic. Welcome aboard!